Tag Archives: first draft

Scrivener project targets

With nanowrimo coming up fast, it’s useful to know how to use the targets option in Scrivener. Please note: these instructions are for the PC version, but the process should be similar in Mac version.

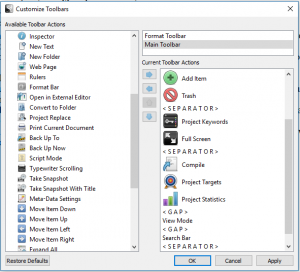
To add the project targets option to your toolbar, click on Tools>Customise toolbar.


Choose the Main Toolbar as the destination, find the project targets button in the list on the left, and then click the right arrow to move it into the list. You can move it up or down to get it exactly where you want it.


If you don’t want the button on your toolbar, then it can be accessed at any time Under Project>Project targets.


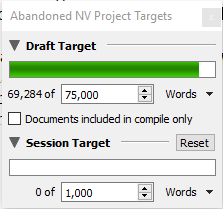
The project target window looks like this – set up your draft target for the total number of words you’re aiming for overall. Tick the box for documents included in compile only if you don’t want to include any project notes you add.


The session target will count the number of words you add in any session – the session ends when you shut the file down. So if you jump from scene to scene, this will keep tally for you.


There’s also a document target. Click on the little circle on the bottom right of the window, and you’ll get the option to set a target for that specific scene, or document.


Once you’ve set up your targets, you’re ready to go!


Alpha reader or beta reader?

Most writers these days are familiar with the concept of a beta reader – someone who reads your work and gives you feedback on it. But what is an alpha reader, and what’s the difference?

An Alpha Reader

An alpha reader is usually a fellow writer, who might be reading the story as you write it, giving technical feedback and helping you to shape the story. They should be familiar with how to structure a story, technical issues such as passive voice, foreshadowing, character development, point of view, etc.


An alpha reader is reading a story that could be very raw indeed, maybe even first draft, and needs to be able to look past the rawness to the heart of the story, and give feedback accordingly.


An alpha reader is the free equivalent of a developmental edit or full critique. It could be a way to help reduce the cost of developmental editing, but be very careful that your alpha reader is experienced enough to be of real help.

A Beta Reader

A beta reader is a reader. They should not be giving technical feedback, but should be explaining how they relate to the story – where do they get bored? Which bits were most exciting? Which characters do they love/hate? Can they understand the story? Do they get lost anywhere?


A beta reader should be reading a story that’s as polished as you can make it. They should be the last step before you pass the work to a professional editor. They might catch typos and other errors, but that is not their job and you should not consider them to be your proofreaders or editors. Instead, they give a reader’s eye view of the story, picking up weaknesses and strong points.


Neither type of reader will fully replace a professional editor, and you should still consider paid editing and then proofreading as your final quality control. But these two stages will help to ensure that the product you pass to the editor is as good as you can make it.


I’ve finished my novel

I’ve finished my novel! I have a complete, readable story. So now I knock together a cover, upload the cover and Word file to Amazon and hit publish, right?


Wrong.


Now the real work begins.


It’s really important to understand that there’s a continuum in writing. There isn’t any bad/good writing divide. There’s a whole range of qualities between barely readable and compelling writing. Just because you’ve completed a draft, and maybe a friend has enjoyed it, doesn’t mean it’s ready to publish. It means you have something you can work on and develop.


In this age where we can literally type “The End” on a draft and then have it for sale within minutes, some people are tempted to do just that. The result is often a barely readable mess, with spelling, punctuation and grammar issues, random tense changes and very odd, distracting formatting and a cover that screams Self Published!


If you just want people to read your work, then there are platforms where you can upload it and have a ready-made audience. In fanfiction particularly, writers can upload stories and be inundated with praise. That’s often not because of the writing, but because of the ideas they express about the characters people have already bonded with.


If you want people to pay for your work and feel so happy they’ve done so that they’ll tell others, then you need to put in a lot more investment – in terms of time, effort and usually cold, hard cash.


I can’t afford it, you might say. That’s where the traditional publishing market comes in. Find yourself a publisher, often via an agent, and they will invest in the writing for you, as long as they feel it’s good enough. Of course, they’ll take their share of the profit for doing so.


Failing that, you need to be prepared to put in the effort yourself. This means revising until you can’t see any way to improve it, asking beta readers to help, working on it some more, and then when you’ve taken it as far as you can, you enlist the professionals – the editors, the formatters, the proofreaders, the cover designers.


After all, the traditionally published writers expect to be put through such quality control, and they will be your rivals for sales. And you have not only your own reputation as a writer to protect, but the reputation of indie authors as a whole.


So now I have a full draft of my novel, I’ll be going back through to beef it up, and then seeking help, and I’ll be saving up for an editor, because even though I’ve studied writing and editing intensively, I know that I’m too close to it to edit my own work. And I’ll be making sure that what I do eventually publish will be the best I can make it, because I want my readers to want more, not to feel they’ve wasted their time and money on an inferior product.


Plotting with Aeon Timeline 2

One of the rewards for nanowrimo this year is a discount off Aeon Timeline. But what use is Aeon Timeline to a novel writer?


I made extensive use of it this year to plan my novel, so here is a basic guide on how I used it. Click on any image to see it larger.
timeline-example

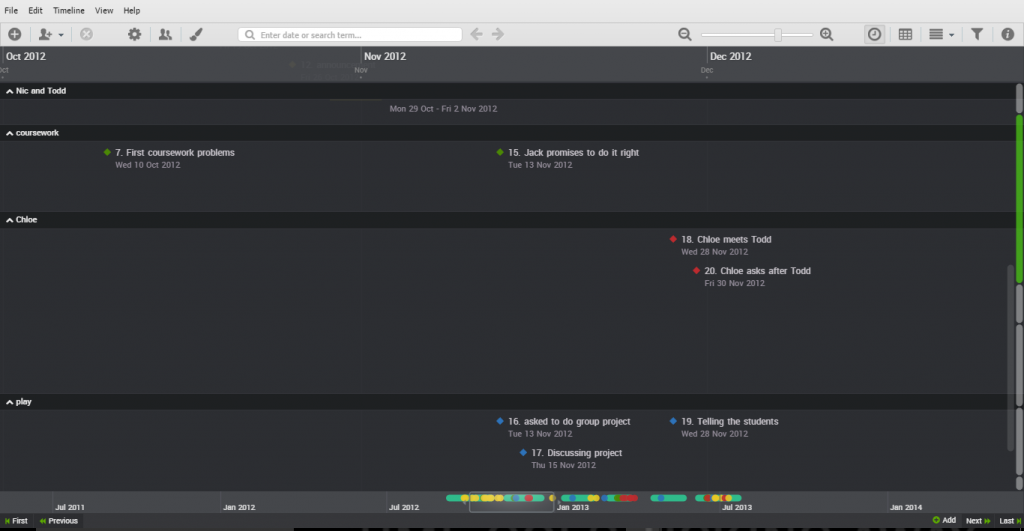
This is a partial view of my completed timeline. You can see the buttons along the top, then the timeline itself, and then events at the corresponding mark on the timeline. Because my novel is set during a school year, it was important to work out term dates and to know what day of the year events took place on.


This view shows the story events separated into different arcs.


At the bottom of the window is a timeline graphic, with a sliding bar representing the part that’s visible, and the coloured blobs representing the events. This provides an overview of the spread of your events. I used colour coding for the different arcs involved.
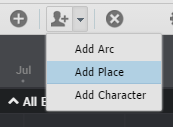
 

add-arcAs well as events, you can add entities to your story – arcs, places or characters, within the fiction template. Arcs help you to keep the different elements straight, while places and characters help you keep track of who’s doing what and where. If you set a birthdate for characters, you can keep track of their ages at different events. This is a feature I didn’t need this time, but relied on a great deal last year.
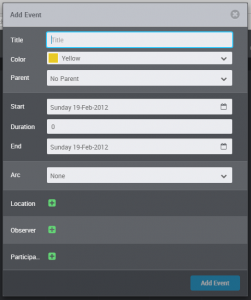


add-eventAdding events to the timeline is easy. Either double click on the timeline, or use the Add event button. The double click method pre-fills the date where you clicked, but you can adjust this at any time.


Fill in the information about your event – at the minimum, you need a title and a date. Choose a colour to represent your event – use colour coding to help you see related events.


Add all the events you need for your story. For each event, you can assign an arc, location, and observers/participants.
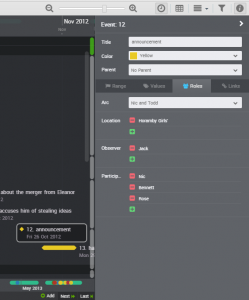
 

info-bar


This is an example of an event with several of the boxes filled in.


Clicking on any event on the timeline opens up the event details for you to tweak as necessary.


Tabs provide places to put notes for the scene, such as what the weather is like, or add tags to the event. You can also nest events, but again this is a feature I haven’t used this year.


It’s straightforward to view a story with or without arcs. I used this to create the different story arcs separately, and then view without arcs to see how the different events were interwoven.
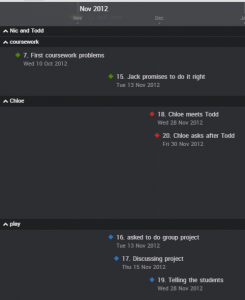
 

timeline-with-arc

This shows the story events broken down into their separate arcs. This enabled me to check that each arc made sense and events happened in the right order.


If an event needs adjusting, you can either click on it and make amendments in the info pane or just drag the event along the timeline until you reach the right date – a tooltip showing the date makes this easy.
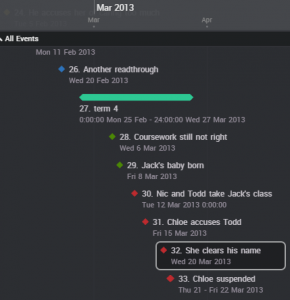


events-with-no-arcAnd this shows the story events interwoven – the coloured blobs indicate what arc they belong to. This enables me to see how the events affect each other, and make sure that there are no issues.
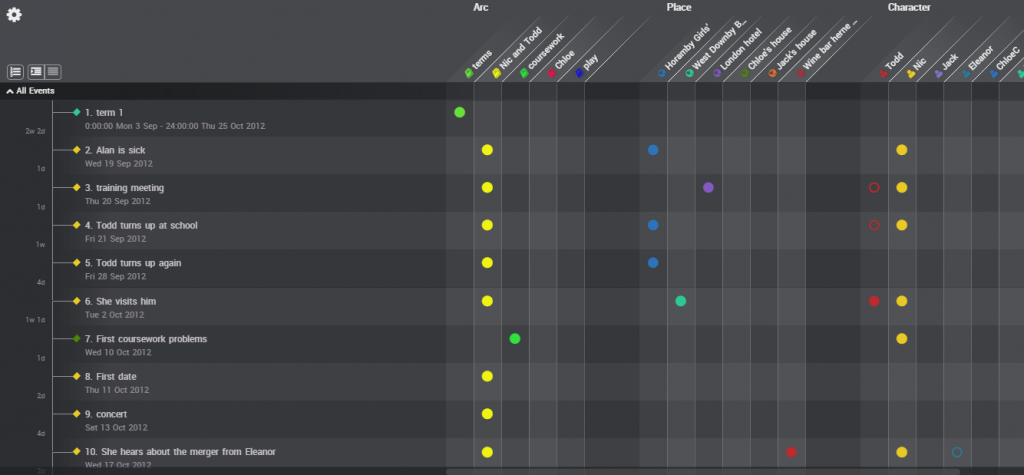


relationship-view

Another view that is useful is the relationship view – a grid indicating events in a list, with markers to show the entities involved. I then used this list to create scenes in Scrivener. All that was left was to actually write them up. I did go back and make changes to the timeline to reflect changes that happened in the novel, to ensure consistency between the two files, but generally the timeline represented the bulk of the planning I needed.


Aeon Timeline 2 will sync with Scrivener, but that’s a feature I haven’t explored yet. For now, the timeline itself is a useful enough tool even without that.


Aeon Timeline 2 also has templates for use with time management projects, legal projects and non-fiction projects – it’s incredibly useful, and the more I explore it, the more useful I find it.


Nanowrimo survival guide

Four days to go until people all round the world hit the keyboard or notebook for (inter)NaNoWriMo, or National Novel Writing Month. The goal is to write 50,000 words during the month of November. But what’s the best way to achieve that?

  1. Aim to write every day. The target is an average of 1667 words per day, but it’s better to aim higher than that in the beginning if possible, as it can be very hard to catch up if you fall behind right at the start. Your enthusiasm may wane later in the month anyway, so bank extra words whenever you can.
  2. Use all your available time – not just that time when you can sit and physically put words down, but the time when you’re cleaning your teeth, or waiting for a bus, or sitting in traffic. Time spent planning means that when you reach the page you’re ready to start the words flowing. The best part of nano is getting totally involved with your story.
  3. Even if you are so hard-pressed for time that you can’t fit in your normal writing session, at least aim to open the file and look at it. That’s easier than ever this year, with Scrivener available on iOS. Letting the story drift from your thoughts, even for one day, can be hard to recover from.
  4. Don’t worry about the quality of what you write. You’re working out the story. There’s plenty of time to polish later. Sometimes you need to push through to figure out what your story is about.
  5. Don’t be afraid to change things as you go along – but don’t go back to fix earlier things. Just make a note to yourself for later and plough onwards. If you must rewrite a section, then leave the original there too for now – they still count as words written during November.
  6. Remember that everyone goes through a stage of hating and doubting their writing. Acknowledge that you’ve reached that stage and work through it. You only have 30 days maximum on the one project. After that, you can re-evaluate and do something else instead, but this project deserves its 30-day 50k-words of attention.
  7. Other ideas will rear their heads once you open yourself up to creativity. Thank them, note them down and promise them attention in December.
  8. If you have the chance, local write-ins can be great for motivation and companionship. There’s nothing quite like sitting at a table with other writers and just hammering out the words.
  9. Accept that whatever work you do will probably need to be redone or at least edited thoroughly, but remember that you’ll be that much better as a writer for the regular practice.
  10. Most of all, when you hit 1st December, don’t stop writing!

Opinions vary on the usefulness of nanowrimo as a writing tool. My opinion is that as long as you don’t expect to write in November, publish in December and then do nothing until the following October, then nano can be a fantastic tool.


Preparing for nanowrimo

It’s halfway through October, and all round the world, writers are preparing for the massive writing festival that is NaNoWriMo, or national novel writing month, the challenge that sees them aiming for a grand total of 50,000 words on a new project within the 30 days of November.


I have to confess that I’m one of them – each year for the past few years, I’ve bashed out a first draft of a novel during November, and then spent the rest of the year working on it. Each year, the draft I finish is a little more polished than the previous year, and I get a little further through editing. Eventually, my aim is to have several novels all nearing the finished product at around the same time, and then start publishing.


But how do you prepare for such a project? And should you be starting before 1st November anyway?


There are two types of writers, when it comes to nano – known as the planners and the pantsers. In fact, these are just two ends of the spectrum, and most people sit some way along the route between. Planners will plan out their story in great detail, world building, character building, plotting out their story. J.K. Rowling has released sheets showing how she planned out the Harry Potter stories in detail. Pantsers will fly by the seat of their pants, starting with a basic idea (or even less than that), and just seeing how it develops. Stephen King is a great proponent of that approach.


This is where I find Scrivener comes in handy: I’ll work out the rough outline of my story, often dividing it into three parts, corresponding to the three act structure. I’ll budget out the words for each part, and create sections for each scene I think needs to happen. The index cards hold a rough summary of the action for that scene, and I plan on between 1000 and 2000 words per scene.


Then when I get to November, I aim to fill in at least one scene each day, providing a structured journey from beginning to end but with flexibility should the story develop in an unexpected way – if your characters don’t rebel at some point in your story and do something you hadn’t planned, then maybe they’re not real enough!


The important thing when tackling nanowrimo is to remember that the aim is to create a first draft of a novel. It is not to create a polished, well-written manuscript that’s ready to send off to agents and publishers. There’s lots of work still to do once that first draft is finished.


Nor should you be worried if the story doesn’t achieve all you hoped for it. That’s what the rest of the year is for. The aim is to bash through your story, become completely involved in it and figure out what works and what doesn’t. Once you’ve finished, you might be able to work with what you have, or it might mean pulling it apart completely and restructuring. Whichever level it’s at, you’ll have had 50k words’ worth of work put into it, and you’ll have a much better idea of what the story needs.


So enjoy your nano prep and enjoy your writing – just be prepared to keep working on it for the rest of the year!


Reading as a writer

Stephen King, along with many other writers, is firm in saying that if you want to write, you also have to read a lot. So what can you learn as a writer who reads?


There are many books around that teach you who to write better, but one of the best ways to learn is to see the advice in action. You want to master Point of View? Study books to see how they handle it. I have a list of books that I turn to when I want to see how to handle First Person, for example, to see how they deal with transitions between the present tense and the past, or to see how they make dialogue sound like fiction and not memoir, or avoid telling instead of showing. You want to see how books handle description? You want to see how they handle pace? How long a chapter usually is in that genre? How long the book is? Find a book and read it as a writer.


There are different levels of reading. Firstly, you learn to read for information and entertainment. Then you start to notice the little tricks that the writer uses to create an effect, or to make a point. Then you reach the point where you can start to use those tricks yourself. How can you expect to use those tricks if you’ve never seen them in use?


It’s also useful to make a note of books that use specific techniques – for example, The Martian is a great book to study. It makes use of first person via logs. It makes use of third person when it needs to. And, of course, it was a self-published book that then attracted a contract and a huge movie.


Beta reading can work too; sometimes it’s even more informative to see a less polished piece of work, and try to figure out what the issue is. But don’t assume that beta reading is enough. The wider you read, the better, and enjoy what you read. Just keep at least half an eye on the tricks the author uses, and think about whether you can adapt them for your own use.


How do I write…?

The question I see asked most often in writing groups is a variation on “How do I write this?”, “How do I start my story?”, “Will writing it this way work?”, “What’s the best Point of View to use?”


It’s as though writers have a limited stock of words and have to get them right first time.


If you’re stuck on how to start your story, or a specific scene, then write your way into it. Start with “It was a dark and stormy night”, or “Once upon a time”, or “When he got home”. Then write the rest of the scene. Once it’s all down, go back to that opening that caused so much trouble. Chances are, you’ll find your opening, and just have to delete the waffle in front of it.


If you’re not sure how to tackle a particular scene, maybe because you’re uncertain whose POV to use, or what tense to use, or whether to write in 1st person or 3rd, then write it one way and then the other. You’ll gain a deeper understanding of the scene, and a better idea of which works better.


And above all, when you reach that point in your story where you feel everything is rubbish and not worth continuing, remember: that’s the point where you prove yourself a true writer. That’s the point when you plough on anyway, remind yourself why you wanted to write that idea in the first place, and just see where you end up.


I’ve completed nanowrimo – what’s next?

That’s the question that many people are asking themselves at the moment, or will do over the next week or so. If you’ve been keeping up with the wordcount, churning out your story and ploughing on to the end, you should have 50k or more words of a first draft and might be considering the next step.

What not to do

Please don’t rush to publish your story as soon as possible. Your story deserves more than that. It deserves a careful re-reading, consideration and editing before it is cast out into the world. The industry gets flooded with nanowrimo stories at this time of year, as new writers, overcome by the excitement of having written a novel, send it out too soon. Readers can be easily put off by a badly presented story, and you risk damaging your reputation as a writer and the reputation of indie writers generally.


For the same reason, please don’t rush it out to an editor or agent. An editor is likely to cost a lot of money if called in at this early stage, and an agent is likely to have many such manuscripts sent to them.


On the other hand, if you just want to share your work with family and friends, why not find a company who will print a few copies for you?

What you should be doing

Set the manuscript aside for a month or so. Then you should be able to read it through with a more objective eye. You might be pleasantly surprised or you might be shocked. Either way, make notes as you read, and then go through and fix the issues you spotted.


  • Take a look at your characterisation – do your characters grow and develop? Do they behave consistently? Are they interesting?
  • Take a look at your show/tell balance – one thing that might help here is to use highlighters. Highlight dialogue in one colour, and telling passages in another. This will give you an overall view of your balance.
  • Take a look at your use of settings. Do you know where the scenes are set? How do the characters and the plot interact with the setting?
  • Take a look at the structure. Is there a clear progression in the story? Is it logical?

Once you’ve considered all these, and revised your story as much as you can accordingly, then you need to seek out a beta reader or two. This should be someone who reads the sort of story you’ve written and is willing to comment honestly on it. If you don’t know anyone suitable, then try looking online, in places such as goodreads.com groups, or search for beta reading services. You might be asked for a small fee, or you might be lucky and find a good reader who will read for free, or will agree to exchange services. Don’t spend too much at this stage!


Another useful resource is scribophile.com, where you critique work to earn points that you spend to post your own work for critiques from other writers.


After you have heard back from the beta reader(s), it’s time to work through some more, with their comments in mind. You don’t have to implement everything they say, but they should raise some points that will help you develop the story.


Once you’ve reached the point where you can do no more yourself, then it’s time to consider whether your work is ready for editing, proofreading and publishing, or whether it’s better to set your manuscript aside, start on the next and return to this one when your writing has improved still further.


NaNoWriMo season

You can’t exist for long in the writing world without hearing at least a mention of NaNoWriMo – national novel writing month. During the month of November, the challenge is to complete a novel of 50,000 words. The writing should not start until 1st November, should be a new project, and the word count target should be reached on or before 30th November. Winners – those who upload and validate at least 50k words – receive all sorts of goodies from the sponsors, such as discounts on writing software or discounted membership of writing communities.


Some people swear by nano – some hate it. Some never open their projects again, some go on to publish. Some enter year after year and fail every time. Some enter every year and win, but do no other writing all year. Some win on their first year and then swear never ever to do it again.


One thing you must be aware of when taking nano on is that the writer who can storm through their novel draft in 30 days or less and then publish it within a week is a very rare creature. What’s much more likely is that you’ll be left with a draft zero, something that has got the story down in words but that needs a lot of refining, redrafting and a major dose of editing before it’s ready to be seen by anyone other than the writer.


So when you have finished nano, don’t rush to publish your work without considering the quality very carefully. On the other hand, don’t throw it into the bin in despair because it’s not ready to publish. That’s only to be expected. Never judge a novel by the first draft.


Please, if you’re going to take part in nanowrimo, enjoy the experience, make the most of the peer support and general buzz about writing, and then consider very carefully your next step. And before you try to submit to agents or publishers, please bear in mind that they have generally learned to dread the words “here is my nanowrimo novel” because of the pile of raw drafts they receive around December/January time!