Author Archives: Lin White

Front matter in a novel

The most important part of your book is the story, but when you’re producing a book for print there are other sections to consider as well. Please note that here I am considering novels only – non-fiction books are a completely different issue.

The front matter is everything that comes before the main story.

This must include:

  • title page
  • imprint page

It may also include any or all of these:

  • half title
  • dedication
  • about the author
  • praise/reviews
  • list of previous works
  • acknowledgements
  • author’s note

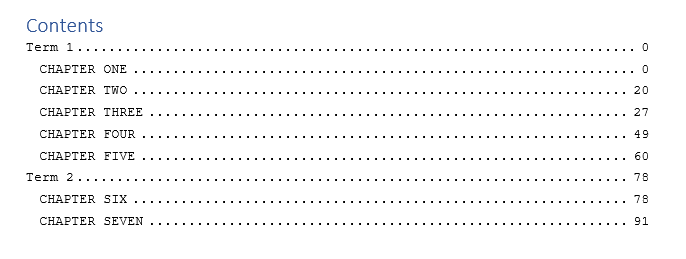
Fiction books do not usually include a table of contents.

Some of this content is necessary, while others are optional. And there are conventions as to whether the content appears on a recto (right-hand page) or verso (left-hand page).

The Title page consists of the title, any subtitle, author’s name (but without the word “by”) and maybe the publisher’s name/logo. The title page is always recto.

The imprint page contains information about the publisher, copyright declaration, any other legal declarations, information about the printer, any information about design etc. This is always verso, on the back of the title page.

The half title consists of the title of the book only, usually centred on the page. This dates from when printers would have stacks of books sitting around waiting for their covers, and they would need to be labelled so they could be identified easily! If a half title is included it is the very first page of the book, and therefore recto.

The Other Books section is most often included as a verso page, and this is often a good pair with the half title. This is a good opportunity to provide information such as the order of a series, or to direct your reader to other series you may have written.

The Dedication is usually recto, giving you the opportunity to dedicate your work prominently to someone special or who has played a part in the creation of the book.

The About the Author section may be at the very front of the book, as an alternative to the half-title. Alternatively, you may prefer to put it amongst the end matter.

Praise/reviews often appear before the title page if used. Again, this can provide an alternative to the half title for pairing with the Other Books page.

Author’s Note and Acknowledgements may both be included within front matter or back matter, but if they appear as front matter it is more common to start them on a recto.

All this means there may well be blank pages included in your front matter. This should be considered along with your printer’s requirements – if the printer prints in 16 page signatures, then your page count will made up to the next 16 count with blank pages if necessary. If the choice is between having extra front matter or extra blank pages at the back, I would choose the front matter. If the choice is between extra front matter or fewer pages and therefore lower cost, that might change the decision!

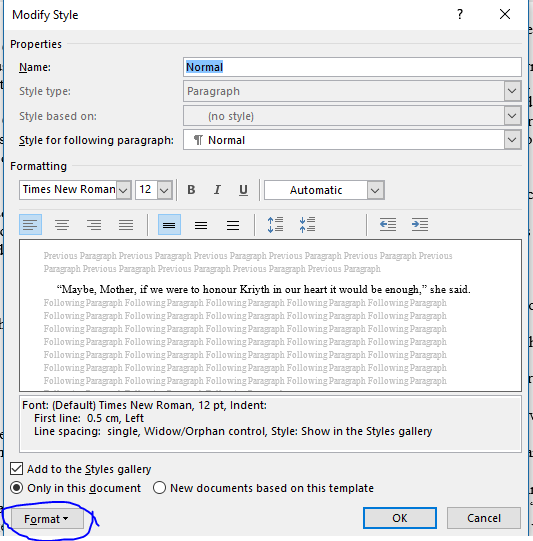
The main content of your book should always start on a recto. Some books follow the convention of starting every chapter on a recto, leaving the previous verso blank if needed, while others will start the chapter on whichever side of the page it falls naturally. Either way, the norm these days is to always start each chapter on a new page, with a large heading partway down and the text itself starting at about the 1/3 mark.

Why not pick up a few books from your bookshelf and take a look at the front matter? That will give you a feel for the standard layouts and content.

Indenting via Styles

To apply an automatic indent to your style, right-click on the style name and select Modify…

Choose Format/Paragraph from the bottom left corner of the dialog box.

In the next dialog box set Indentation Special to First Line and size to 0.5cm (the default of 1.27cm/half an inch is too big and will leave unsightly gaps).

Click on OK.

All styles based on Normal will update to include this, so you might need to modify headings etc to remove the first line indent so they line up properly.

Submitting your manuscript

I do a lot of work with formatting and proofreading manuscripts for print or ebook, and find the same problems cropping up again and again, so here’s some suggestions to make life easier for yourself and for your formatter:

  1. Don’t get too fancy with your formatting.
    Times New Roman 12pt is straightforward. Paragraphs should be indicated with either automatic indenting or automatic spacing between – this should be done via the Styles function, preferably, as any change that overrides the styles function could cause issues throughout the file. Using tabs or spaces to indent, or leaving blank lines between paragraphs, is not a good idea. If you don’t know how to indent/space automatically, your best option is to leave the text un-indented and let your formatter deal with it.
  2. Be careful with versions.
    Make sure your file versions are clearly labelled, and make sure you are sending the right version to your formatter/proofreader. And don’t keep sending updates once you’ve sent them a file! If they have to start all over again with a new version you’re increasing the time taken and almost certainly increasing the cost involved.
  3. Give any changes and respond to any queries as clearly as you can.
    Gather all corrections together and provide them in a single clear list, with indication as to what is wrong and how it needs to be put right. Text to search on is always useful.

What type of editor do I need?

One important question to establish the answer to early on is what level of editing your work needs. Do you need a developmental editor, who can help you work on the structure of your book? Do you need a copy editor, who will make sure it follows a style guide and reads consistently? Or are you at the final stage, where it’s just a proofread to check for remaining errors?

But another important question is what the editor specialises in. There are many different types of writing – fiction, which subdivides by genre; self-help books; technical books; academic writing, and many more. And each editor will have their strengths and weaknesses and preferred types of project.

Personally, I’m well-versed in issues such as plot development, story arcs, and point of view issues, but show me a list of citations and I’ll struggle. For other editors, who are used to working on highly academic or technical texts, fiction might be their weakness.

Each editor will have their usual language to work in, as well. Believe it or not, there are definite differences between UK English, American English and Australian English, for example, and while some editors might well work competently in more than one variety, others will prefer to work in the one most familiar to them, while some localisms might well be overlooked or misunderstood if your editor is not familiar with them.

So when you’re looking for an editor, remember to check what type of writing they are used to editing, or prefer to edit, and then you’re more likely to find your perfect match.

How can you improve your novel opening?

One effective way to strengthen your own writing is to look at other people’s writing. Read the opening of a novel, or preferably several. How do they introduce the character? What idea do they give you of the character’s wants and needs? What promise do they make in the opening?

Now look at your writing. What do we learn about your character and the world they are in? Do we learn what they are missing in life? What lie are they telling themselves in order to feel happy? What do they think they need?

How does the setting relate to the content? Do we get a real sense of place, or could the events be happening anywhere?

How far does the story progress in the opening? Does anything actually happen, or is it all about introducing your world and the characters?

Years ago, a story might have started with a long preamble, setting the scene and mood. These days, the fashion is far more to start with action, and then cut back a little and fill in background once the reader is engaged.

Likewise, older stories might well use omniscient voice, but more modern stories tend towards close third point of view, so that the reader can really identify with your character and empathise with them.

Get into the habit of active reading – not just reading to enjoy the story, but to pull apart the storycraft and writing. What can you learn from any book that you can carry back to your own work? What pitfalls can you see and therefore avoid?

Creating a table of contents

A table of contents is a quick way to navigate around your document. In an ebook, it can provide links to chapter headings. In a print book, it will list page numbers for quick reference.

Styles are the key to your table of contents – if you consistently style chapter headings with the style Heading 1, then any ebook generator should take those styles and create your linked table of contents automatically.

The bonus is that you can use these styles to help you navigate around your Word document as well, using the Navigation Pane.

As always, there are two elements to working with Styles – apply your style to the text, and modify your style to have the appearance you want.

To apply the style, highlight the chapter heading and on the Home tab, click on the style labelled Heading 1.

To modify the appearance of that style, right-click on the style in the listing and choose Modify…

Use the Format button on the bottom left to access the main formatting dialog boxes.

Changing the appearance of any style in this way will automatically change the appearance of any text that has been marked as that style.

Alternatively, if you’ve already got your heading just as you want it to appear, highlight it, and then right-click on the style in the Styles panel. Choose Update Style Heading 1 to match Selection.

This will both mark the text with that style and set that style to the same appearance as the highlighted text (updating anything else marked with that style to the same appearance).

View the Navigation Pane by ticking the box on the View tab.

This provides a quick way to see and move around the structure of your document. If you’ve used more than one level of Heading (Heading 1, Heading 2, Heading 3 etc), then you can see the hierarchy of your layout.

To include a Table of Contents in your printed document, place your cursor where you want it to appear and then on the References tab click on Table of Contents. You can use an automatically generated Table of Contents, or customise it to create your own (for example, you can choose how many levels of heading you want to show – do you want just chapter headings, or do you want subheadings listed as well?).

Using Track Changes in Word

When working with an editor, it’s very likely you’ll need to be able to use the Track Changes feature in Word. This feature allows you to see what changes the editor suggests/recommends, and to accept or reject them individually or in bulk.

Text where changes are tracked can look messy. Any changes are marked (usually but not always in red), with either underlining for added text or strikethrough for deleted text. If two people have worked on a document, the changes will be colour-coded for each person.

There may be other changes that aren’t immediately visible apart from the presence of the line on the left, such as paragraph endings added or removed. To see these, try turning on the invisible marks.

The easiest way to see the clean, edited version of the text is to select No Markup on the Track Changes toolbar, where in this example it says All Markup. This will display the text as though all changes have been accepted.

Use Previous and Next to step through the changes without taking action.

Accept and Reject will take action on the change under the cursor and move the cursor to the next action. If you’d rather see the effect of the action before moving on, then use the dropdown arrow underneath to take action but not move on.

Another action from the dropdown is Accept all Changes and Stop Tracking. Use this if you’re happy with all the changes suggested and want to accept them en bloc.

Be careful – Find and Replace won’t work properly if a word has changes tracked within it. For this reason, editors will often replace an entire word rather than changing one letter within it.

The page layout can also be affected by changes being tracked – for example, natural page breaks will move around.

If in doubt, save a new copy of your document before using the Accept All option. You can then compare versions if you need to.

Some editors may lock the document so you can’t make accept/reject or turn off tracking, especially if they need to do further passes. It’s important that they are aware of any changes made, so they can double-check they’ve been made properly. It’s very easy for spaces to creep in or disappear between words, for example! If you make changes to the edited document without tracking them, your editor might need to check the whole document again, incurring extra time and expense.

Once all changes have been accepted or rejected, it’s a good idea to have a proofreader cast a final eye over your text. This is best done once the text is typeset, as they can then check for layout issues as well.

What are styles?

Styles provide an efficient way to manage the appearance of any document. For anything other than a very simple title/content document, there’s usually a structure: headings, subheadings, body text. If you apply styles throughout your document, it’s a much simpler process to change the appearance of any one of those elements without affecting the rest.

Styles have two stages:

The first task is to decide what role a piece of text plays in your document. Is it a top-level heading? Subheading? Body text? Quote? Caption? Apply a style to match that role. There are several built in to Word that you can use or modify, or you can create your own.

The second task is to decide how that type of text should look. To do this, you modify your style, either by right-clicking on the style in the style list and selecting Modify, or by modifying your text and then right-clicking on the style in the style list and choosing Update Style to Match Selection.

In Word, you can create paragraph styles, which affect the whole paragraph, character styles, which affect only the characters the style is applied to, or a combination of both.

For example, Emphasis is a character style that applies italics to the selected text. Using Emphasis style rather than the Italics button means that if you later decide to change the font in the whole document you don’t risk losing your italics.

Setting a document up with all formatting done through styles rather than direct formatting is just a tiny bit more work than formatting directly, but with any substantial document it’s then so much easier to amend if needed.

Another advantage is that you can use the styles to check your structure and to move around your document easily, by using the Navigation Pane.

The styles may also be used to generate an automatic Table of Contents.

Indenting paragraphs

If you look inside any printed book, you’ll see paragraphs are indented. But how and why is this done?

The why is easy. There are two ways to visually signal the start of a new paragraph. One is to leave white space between paragraphs – a blank line or half a line is the norm. But this spreads the text out more on the page. A more compact way is to indent the beginning of the paragraph a little, which gives the same signal but takes up less space.

As to the how, there are a few ways to achieve it, some good and some not so good.

The worst way is to use spaces, because spaces can vary in width visually, and because you would need to be very careful to always add the same number of spaces to give a consistent look.

Then there’s tabs. Another way that works, but isn’t very efficient. What if you change your mind? You would need to remove – or add – tabs throughout.

A better way is to use the paragraph formatting. In Word, click the little marker at the corner of the paragraph formatting section on the Home tab.

This opens the paragraph formatting box.

Why set to 0.5cm? Anything bigger risks gaps in the text.

See how one line finishes short and looks like it’s floating out of place? Smaller indents are your key.

The best way to apply indents is to use the paragraph setting in the Styles. Apply your style to the text, and then right-click the style name and choose Modify.

Use the Format button at the bottom, select Paragraph… and then make the adjustment as above. This will then be applied to all text set to use that style.

Should you later want to adjust your indents, then all you need to do is modify the style again.

So much easier than trying to delete extra spaces or tabs!

Writing Books – Creating Character Arcs

What is the lie your character believes? What do they want, as opposed to what they need? How are they going to travel from their starting point to their end point?

These are all questions this book will guide you through asking, as you plan out your character arcs. The link between character arc and story arc is studied carefully, and examples are given from several sources, including Toy Story and A Christmas Carol, so that there’s bound to be several that you recognise.

The positive arc, negative arc and flat arc are all discussed in detail, in relation to the standard three-act structure. An FAQ offers answers to such issues as subplots, minor characters and impact characters.

If you’re looking for a way to make your characters more meaningful, and to integrate character into plot, then this book will prove a helpful guide.