
The beautiful thing about writing is that it can be done almost anywhere, almost any time, and needs very little specialist equipment. A cheap notebook and pen and a bit of space to work is all that is necessary, but many projects demand a little more in the way of organisation.
Most people will use either Microsoft Word or Open Office as their main word processor, and either has the tools needed to create the main document for your piece of writing.
However, if you are creating a large project, for example a full novel or non-fiction piece of work, you might find that you struggle to keep all the different parts of your project organised. That’s when a program like Scrivener comes in.
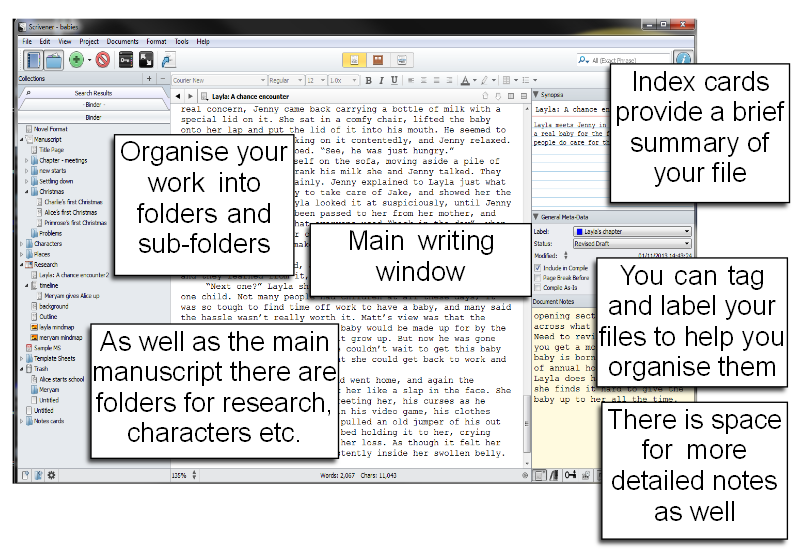
Scrivener main window
Scrivener provides an easy way to organise chunks of writing, by labelling each chunk, tagging with key words and statuses and providing an overview that is easy to rearrange.
With this program, you work in smaller files, which are usually scenes or chapters, and you can label them and rearrange them as you wish to form a larger project. There is also the facility to store other files that are not part of the main document, whether these be character notes or general research. You can even include PDFs or images within your Scrivener project folder. This makes it far easier to work on different areas of a large project.

Scrivener corkboard view
Having labelled these files/scenes, it is also easy to rearrange them. Those index cards that you filled out for each file are available on the corkboard, where you can easily see the overall structure and change it around as much as you wish. Colour coding helps to see, for example, how different points of view are arranged, and you can also see the status of each part easily.
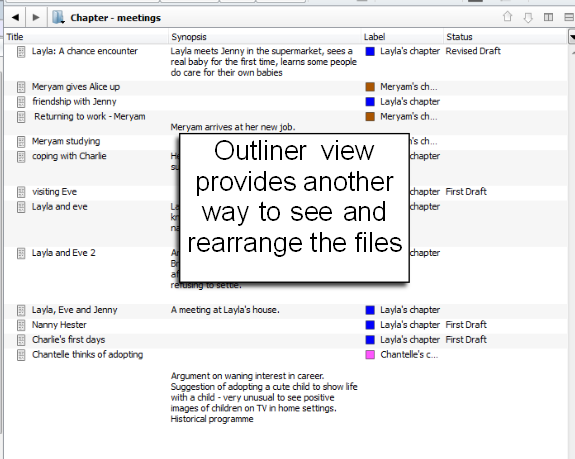
Scrivener outliner view
Another way of looking at the structure of your project is through the outliner window. This gives similar information to corkboard view, but in a different format.
Although Scrivener offers many features, probably more than most writers will use, a comprehensive tutorial offers a guide into what the software can do, and I found it quick and easy to get to the point where I could use it for my own work. Now I just dip back into the tutorial whenever I need to find out how to do something new, like filtering the projects by label or keyword, or adding and editing footnotes/endnotes.
Scrivener even saves your work automatically, so no more accidentally losing large chunks because you forgot to hit save! You can take snapshots of any section before working on it, so that you can compare versions later on, or roll back changes if after hours of work you decide that the first version was better.
At any point in your project, you can generate a view that merges all the files into one long file for easier reading, and when you are ready to move on you can compile the project into a text file suitable for formatting in a word processing program.
Scrivener comes in both Mac and PC versions, and is available as for a free 30 day trial should you wish to play with it before parting with your money. I find it so easy to organise my work with it that now I couldn’t imagine tackling a long project without it.
This sounds very interesting. Thanks Lin for an informative piece…