Rein or Reign?

These two words are often confused. Rein is related to horses. Reign is related to kings and queens.

So where does the confusion lie?

In a phrase like reining in – he reined in his activities because he was exhausted – reining in refers to holding the horse back, restricting its movement.

In a phrase like free rein – he was given free rein to organise the office as he wished – free rein refers to slackening off the horse’s rein so that it can move more freely.

But confusion can arise when you consider that being given free reign could also refer to being free as the ruler to do what you want.

So consider whether you are talking about rein as in a horse-related metaphor or as in a king-related metaphor. There are places where either would be suitable, but there are definitely places when only the horse one makes sense!

Scrivener project targets

With nanowrimo coming up fast, it’s useful to know how to use the targets option in Scrivener. Please note: these instructions are for the PC version, but the process should be similar in Mac version.

To add the project targets option to your toolbar, click on Tools>Customise toolbar.


Choose the Main Toolbar as the destination, find the project targets button in the list on the left, and then click the right arrow to move it into the list. You can move it up or down to get it exactly where you want it.


If you don’t want the button on your toolbar, then it can be accessed at any time Under Project>Project targets.


The project target window looks like this – set up your draft target for the total number of words you’re aiming for overall. Tick the box for documents included in compile only if you don’t want to include any project notes you add.


The session target will count the number of words you add in any session – the session ends when you shut the file down. So if you jump from scene to scene, this will keep tally for you.


There’s also a document target. Click on the little circle on the bottom right of the window, and you’ll get the option to set a target for that specific scene, or document.


Once you’ve set up your targets, you’re ready to go!


The benefit of styles

When typesetting for print or ebook, styles are important. But what are they, and how do they help?


Just imagine the structure of your book for a minute. It’s probably something like

  • chapter number
  • chapter title
  • first para flush left with a drop cap
  • main text indented
  • divider
  • para flush left
  • main text indented

And repeat for every chapter, as often as necessary.


Now imagine that you want to increase the size of the chapter title, or change the font of the main text. Without styles, you would need to go to each small chunk in turn and change the formatting on it. If you have two or three changes to make on each chunk, it could take some time. Even using format painter, it’s fiddly and there’s the danger of missing something.


Now consider using styles. Styles come in two stages – tell the text what style you want it to use, and tell the style how it needs to display the text. So you’ll set the Heading 1 style to the right font, point size and weight, and you’ll highlight the text and apply the Heading 1 style. You can do these two steps in either order.


Once you’ve been through the entire document, applying styles to everything, it’s just a matter of changing the settings for that particular style, and that will then be applied all the way through the document, wherever that style has been applied.


One additional benefit of using styles correctly is that an automatic Table of Contents can be generated, using the specified styles to pick out the links that are needed and automatically adding the correct page number. This can be updated as the layout of the book is altered.


It’s also possible to save a set of styles, so it’s easy to copy them over from one document to another, ensuring efficiency and consistency.


The different types of publishing

Traditional Publishing

A traditional publisher will choose to invest in your work. They will help you to edit and polish your manuscript, organise a cover design and publish the book. They might or might not pay you an advance – a lump sum. Once the book’s royalties earn out that advance (if it ever does), you will receive royalties on sales, but the publisher will take their cut as well. They will almost certainly do some marketing, although they will still expect the author, especially if a first-time author, to do plenty of marketing of their own. They will be very fussy about who they take on – their goal is to run an efficient business. The biggest publishers will only accept work submitted by an agent, not work submitted directly from the author. The advantage of traditional publishing is the power of the publisher to promote the book and get it into bookstores.

Be aware:

If going with a traditional publisher, be aware of their reputation. How much marketing do they do? What quality editing do they provide? What is their quality control like? How fussy are they about who they pick up as an author? The main danger is signing your rights over to a publisher who does very little for you. Using an agent might help with this, but the agent will take a cut as well for the privilege.

Vanity Publishing

Vanity publishing has a bad reputation, but it has its place.  With vanity publishing, you pay the publisher to prepare and print copies of your book. Ideal for those with plenty of money, limited time and the wish to produce a one-off pet project, they are less than ideal for those actually seeking to earn through their writing, as they make their money from their writers and not for their writers. They might charge high prices for their services, and marketing may well be minimal or non-existent. They will probably take a large chunk of any royalties as well. The advantage of vanity publishing is the convenience.

Be aware:

The main danger is paying a large amount of money for services that at best you could have obtained cheaper elsewhere and at worst are poor quality as well.

Self Publishing*

With the ease of publishing these days, some people will finish a draft and immediately publish it, particularly as an ebook, with no quality control and with a cover design that marks the work out as amateur. Unfortunately, these tend to make little money and damage the reputation of ebooks generally, as well as producing a raft of scathing reviews that hurt the author. The advantage of self publishing is that it’s quick, easy and free.

Be aware:

It’s important not to rush a project out with no quality control, damaging your reputation as a writer. All the best-selling authors will have gone through a rigorous editing and proofreading, and professional cover design. That’s what your writing has to compete with if you’re trying to sell it.

Indie Publishing (Independent Publishing)*

An Indie publisher will also publish their own work, but will treat the whole thing as a business, investing in their writing via editing, proofreading, formatting and a professional cover. There are many writers who have chosen to publish independently after being traditionally published. There are some examples (but nowhere near as many) of writers going the other way – of being picked up by a trad publisher after publishing their own work. The advantage of Indie publishing is that the author maintains full control over the project and the end result.

Be aware:

You will need to act as a professional, investigating different editors, finding a cover designer who produces quality covers, and mastering marketing and other ancillary skills. An Indie publisher is a business person, handling all aspects of the publishing trade. It is hard work, but can also be very rewarding. An indie author does not do everything themselves, but engages other professionals to handle aspects of the publishing process, ensuring that each section is handled by someone who understands the job and can do their best for the project.

*Please note:

Not everyone makes the same distinction in terminology between self-publishers and indie publishers. The difference is in the attitude of the author, not in the term itself, but I find the distinction a useful one.


Exam strategy

At the moment, I’m busy most evenings tutoring, as we reach the peak of exam revision season. I’m often asked what the best way is to prepare for exams.


Most of the tutoring I’m doing is for maths, so I’m thinking in terms of those specifically, but most of this advice applies to any subject.

Past Papers

The best way to revise is to find a source of past papers to work through. Exam boards make past papers available on their websites, along with the mark schemes, although the latest past paper is usually reserved for schools to use as a formal mock exam. So download a past paper and work through it, marking your own work, and gradually weaning yourself away from using your books to look up techniques.


Alternatively, especially for the new-style maths questions, you can buy a pack of practice exam papers.

Exam Question Triage

Practise going through the paper quickly, categorising each question in one of three ways:

  • Easy answer, no problems at all
  • I think I could probably get this with a bit of thought
  • No way do I have any idea what they want with this one.

Answer all the questions in the first category (unless your revision is tight for time, in which case you can skip these altogether).


Then start working through the second category, seeing how far you can get on your own and then looking up the rest of the technique. If necessary, check the answer and any guidance/intermediate mark information given, and work backwards.


Don’t worry about the third category until you’re more comfortable with category 2. You might well find that as you master 2, you put more questions in that category instead of 3 anyway.

On the Day

By the time you get to exam day, you should be practised in dividing the questions in this way. Make sure you answer all the category 1 questions quickly and accurately. Then go for the marks in category 2. If you still have time, try to put something down for category 3 questions. If you can show that you understand what maths is involved, and get some way towards an answer, then you might pick up a valuable mark or two.


Whatever you do, don’t waste time on a question while there are easier marks to be picked up elsewhere.


Alpha reader or beta reader?

Most writers these days are familiar with the concept of a beta reader – someone who reads your work and gives you feedback on it. But what is an alpha reader, and what’s the difference?

An Alpha Reader

An alpha reader is usually a fellow writer, who might be reading the story as you write it, giving technical feedback and helping you to shape the story. They should be familiar with how to structure a story, technical issues such as passive voice, foreshadowing, character development, point of view, etc.


An alpha reader is reading a story that could be very raw indeed, maybe even first draft, and needs to be able to look past the rawness to the heart of the story, and give feedback accordingly.


An alpha reader is the free equivalent of a developmental edit or full critique. It could be a way to help reduce the cost of developmental editing, but be very careful that your alpha reader is experienced enough to be of real help.

A Beta Reader

A beta reader is a reader. They should not be giving technical feedback, but should be explaining how they relate to the story – where do they get bored? Which bits were most exciting? Which characters do they love/hate? Can they understand the story? Do they get lost anywhere?


A beta reader should be reading a story that’s as polished as you can make it. They should be the last step before you pass the work to a professional editor. They might catch typos and other errors, but that is not their job and you should not consider them to be your proofreaders or editors. Instead, they give a reader’s eye view of the story, picking up weaknesses and strong points.


Neither type of reader will fully replace a professional editor, and you should still consider paid editing and then proofreading as your final quality control. But these two stages will help to ensure that the product you pass to the editor is as good as you can make it.


How much does self-publishing cost?

This question receives many different answers, from thousands of pounds to nothing. So what’s really going on?


First of all, actually publishing your book costs nothing. Uploading files to Amazon and creating either ebook or print version does not involve a fee.


But it’s not as simple as that. There needs to be quality control of what you’re uploading. Has your work been reviewed, to ensure that it makes sense, that it’s well written, that it doesn’t contain silly typos or other errors that will put your reader off? Will your cover design attract readers to your book? Is your layout correctly formatted for whatever platform you want to publish on?


If you’re self-publishing, then all those quality control issues come down to you. It’s your responsibility to get an editor to go through your work, to get a good cover design done, to ensure the formatting is correct.


Some of these you can do yourself, if you have the skills, but editing is one of those jobs that must be done by someone else to be done well; you are too close to your own work, and just can’t see what you’ve actually written as opposed to what you think you’ve written.


Even cover design and formatting are worth paying experts for; while anyone can throw a cover together, books are a competitive market, and your book deserves a cover that will attract the reader. Likewise, formatting can be fiddly and frustrating if you’re new to it. Why not spend your time writing, and pay the experts to do their job?


There are publishing companies around who offer to do all this as a package deal, for a price. Be very wary of these; generally, they make their money from the services they sell to you, not from their share of the books sold (although they take a good slice of that too). You risk paying a lot of money for services you could have got cheaper separately, and losing control of your book as well.


What if you can’t afford to pay an editor, cover designer etc?


The answer then is not to just put it out anyway. The quality is likely to be poor, and that will put readers off anything else you write, and weaken the reputation of self-published books generally.


Traditional publishing involves a publisher liking your book enough to invest money in it. They keep part of the sales, yes, and you might lose some of the control over your book, but they are the ones who take the financial risk. Remember, if they ask you for money to publish, they are not a traditional publishing company.


So in the end it comes down to this: please either be prepared to invest money as well as time in your writing to ensure quality (after all, you’re expecting others to invest money in your books!), or find someone else who is willing to do so.


Openings

Within the first page, you need to catch the reader’s attention.

  • What does your character want or need? What’s in the way?
  • What are they like as a person? Does a real sense of personality come across?
  • Is everything happening in a vacuum, or is it solidly grounded in time and space?
  • Is there a sense of direction in your story?
  • Is there a sense of unease, of something wrong?
  • How does the writing flow? Silly errors will put the reader off.


I’ve finished my novel

I’ve finished my novel! I have a complete, readable story. So now I knock together a cover, upload the cover and Word file to Amazon and hit publish, right?


Wrong.


Now the real work begins.


It’s really important to understand that there’s a continuum in writing. There isn’t any bad/good writing divide. There’s a whole range of qualities between barely readable and compelling writing. Just because you’ve completed a draft, and maybe a friend has enjoyed it, doesn’t mean it’s ready to publish. It means you have something you can work on and develop.


In this age where we can literally type “The End” on a draft and then have it for sale within minutes, some people are tempted to do just that. The result is often a barely readable mess, with spelling, punctuation and grammar issues, random tense changes and very odd, distracting formatting and a cover that screams Self Published!


If you just want people to read your work, then there are platforms where you can upload it and have a ready-made audience. In fanfiction particularly, writers can upload stories and be inundated with praise. That’s often not because of the writing, but because of the ideas they express about the characters people have already bonded with.


If you want people to pay for your work and feel so happy they’ve done so that they’ll tell others, then you need to put in a lot more investment – in terms of time, effort and usually cold, hard cash.


I can’t afford it, you might say. That’s where the traditional publishing market comes in. Find yourself a publisher, often via an agent, and they will invest in the writing for you, as long as they feel it’s good enough. Of course, they’ll take their share of the profit for doing so.


Failing that, you need to be prepared to put in the effort yourself. This means revising until you can’t see any way to improve it, asking beta readers to help, working on it some more, and then when you’ve taken it as far as you can, you enlist the professionals – the editors, the formatters, the proofreaders, the cover designers.


After all, the traditionally published writers expect to be put through such quality control, and they will be your rivals for sales. And you have not only your own reputation as a writer to protect, but the reputation of indie authors as a whole.


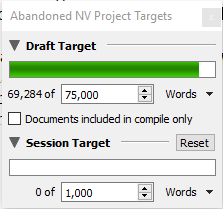
So now I have a full draft of my novel, I’ll be going back through to beef it up, and then seeking help, and I’ll be saving up for an editor, because even though I’ve studied writing and editing intensively, I know that I’m too close to it to edit my own work. And I’ll be making sure that what I do eventually publish will be the best I can make it, because I want my readers to want more, not to feel they’ve wasted their time and money on an inferior product.


Sending your manuscript to a beta reader

When sending your manuscript to a publisher or agent, it’s vital that you follow their instructions exactly. Whatever font they recommend, whatever layout they recommend – if you don’t follow their guidelines, then at best you’ll irritate them and at worst your manuscript will be deleted unread.


However, when sending out to a beta reader, it’s nowhere near as straightforward. In one sense, it doesn’t matter at all, but I’ve looked at a lot of manuscripts in the past month as I offered free readings of the first 5k words, as an experiment, and I started to notice a few issues.


  • Your font should be easy to read and in a reasonable size. I see no reason to use anything more fancy than 12pt Times New Roman. Some are submitted in Courier New, but that tends to give the manuscript a “typewritten” feel, and can be hard on the eye.
  • I recommend including a cover page, containing the title, author and basic contact details. This is useful in case the original email disappears, and as a reminder of the information – it’s very frustrating to not have the book’s title displayed anywhere!
  • It would also be useful to include basic information at the start of your book, such as the blurb and a little about your writing background and your intentions for the book. Be wary of including a full synopsis here though – a reader will generally not want spoilers before reading.
  • Save the file with a clear filename – preferably your book title, with or without extra information. A file entitled “ABBC” really isn’t useful! You might be familiar with it as a nickname for your book, but your reader isn’t.
  • Make good use of the header/footer facility. A page number on the page itself will ensure that you and the reader are both considering the same text on the same page. Having the author/title repeated at the top of the page can be useful.
  • Label your chapter changes clearly. A reader will often read in chapters, and it’s irritating to discover that there are no chapters, or only vague line spaces for breaks. Yes, some writers do write without chapters, but it’s not recommended unless you’re really sure what you’re doing. It’s easier to consider issues such as plot when you can break it down chapter by chapter.
  • Start each chapter on a new page. Page count is not an issue with electronic versions, and the visual white space helps to make the jump from chapter to chapter. It will also help you think clearly about your chapter breaks.
  • Make sure that at the very least you have run spell-check before submitting to a reader. While they do not expect a clean, proofread version, it’s incredibly irritating to discover error after error that could have been easily discovered and fixed with a quick read-through.